1. Enter the text cd "C:\Program Files\Tracker Software\PDF-XChange Standard" and press Enter.
2. Enter pdfSaver.exe /AddPrinter <PrinterName> [/NoNotify] to create new copies of PDF-XChange Standard in the printers list.
The parameters operate as follows:
<AddPrinter> adds a new printer to the printers list.
<PrinterName> determines
the printer name. If the printer name contains spaces then it must be
enclosed in quotation marks, for example "Sample Printer ". A name
different from those of existing printers must be used.
<NoNotify> is an optional parameter that prevents the sending of information about changes in the printers list to other applications.
Создать LiveUSB (Linux, Windows — не важно, главное, чтобы был testdisk).
Через LiveUSB запустить testdisk и найти старые разделы (через [Quick Search] и [Deeper Search]).
Если данные на них видны, то можно спокойно сохранить их, разумеется,
на другой жёсткий диск. Если нет — то идти дальше по пунктам.
Если есть возможность, лучше создать образ всего жёсткого диска и
работать только с ним. Это может сделать почти любая программа для
восстановления данных. В Linux можно воспользоваться командой sudo dd if="/dev/DISKNAME" of="/PATH/TO/IMAGE.dd" conv=sync,noerror (ее описание есть выше).
LiveUSB — это, конечно, хорошо, но как показал опыт, не всякая
программа будет работать в ней. R-Linux работать отказалась. Виртуалка,
кстати, тоже зависала несколько раз. Поэтому, скорее всего, нужна будет
полноценная установленная система (Linux, Windows — не важно).
Далее снова открыть testdisk. Если есть образ диска, то открыть его
так: testdisk /path/to/image.dd. Найти свои старые разделы, выбрать их и
нажать [Write] (вверху есть подробная инструкция). Это единственная
программа, которой я позволю вносить изменения на диск (т.к. в случае
ошибки всегда можно повторить процедуру). Если есть возможность, нужно
создать через testdisk образы восстановленных разделов.
Поставить программы для восстановления данных и «скормить» им
восстановленные testdisk-ом разделы, а лучше их образы. Не позволять
программам вносить изменений (если нет сохранённых образов разделов) —
они должны только показать данные, которые можно будет восстановить.
If you have a home lab environment or other lab that you continually
test various solutions, licensing and trial expiration is a challenge
that you constantly tend to run into. It is just part of the fun of lab
environments. While most trials are fairly “hard and fast” and don’t
allow you to reset the trial expiration, if you work with Microsoft
Windows Server and Remote Desktop Services (RDS), there is a “hack” that
allows you to effectively reset the expiration of Remote Desktop
Services grace period where you can essentially rewind the clock on
your RDS licensing if you are making use of this role inside your lab
environment. In my lab environment, I am making use of Windows Server
2019 for my Windows workloads. In this post, I will show how to reset
120 day RDS Grace period on 2016 and 2019 Windows Server. Let’s see.
Remote Desktop Services RDS Licensing
When you install Windows Server 2016 or 2019 as with previous Windows
versions, you get the normal ability to have the two sessions that you
generally have available for administering. However, when you install
the true Remote Desktop Services role, you have the ability to have
multiple sessions to your server.
When you install the role, by default, you have a 120-day grace
period that Microsoft gives you to properly license the server for use
as an RDS installation. If you are using a server in a lab environment,
most likely, you are not going to license this type of server outside of
production.
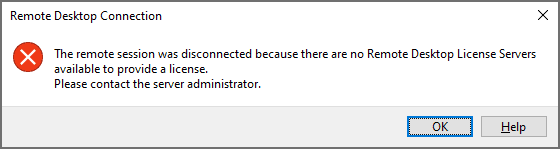
Once the 120 day grace period has expired, you will see the following error when you attempt to RDP to the server:
Error after 120 day grace period has expired for Remote Desktop Services
You can either redeploy your Windows Server which will allow you to
spin up a new 120 day grace period, or you can actually reset the grace
period. If you are like me, the latter is certainly the path of least
resistance and work involved. Let’s take a look at how to reset the 120
day RDS grace period.
You can take a closer look at the official licensing documentation for Remote Desktop Services here:
For the exercise of resetting the 120 day grace period for the RDS
role, the registry editor is your friend and makes this process easy.
Before we begin, there are a couple of disclaimers to make here. Editing
the registry can result in totally destroying a Windows system, so
proceed with any low-level registry edits with caution. If you are
working with a virtual machine, it is always a good practice to create a
quick snapshot of the Windows virtual machine before you begin.
Additionally, for production systems, resetting the 120 day grace
period should only be done for systems that are not in production as you
should have proper licensing installed for production use.
To reset the grace period, there are actually just 3 steps involved:
Change permissions on the RCM > GracePeriod key
Delete the “Timebomb” registry entry
Reboot the server
Now that we have level-set, once you have your snapshot or other
backup created, you need to navigate to the following location on your
RDS server:
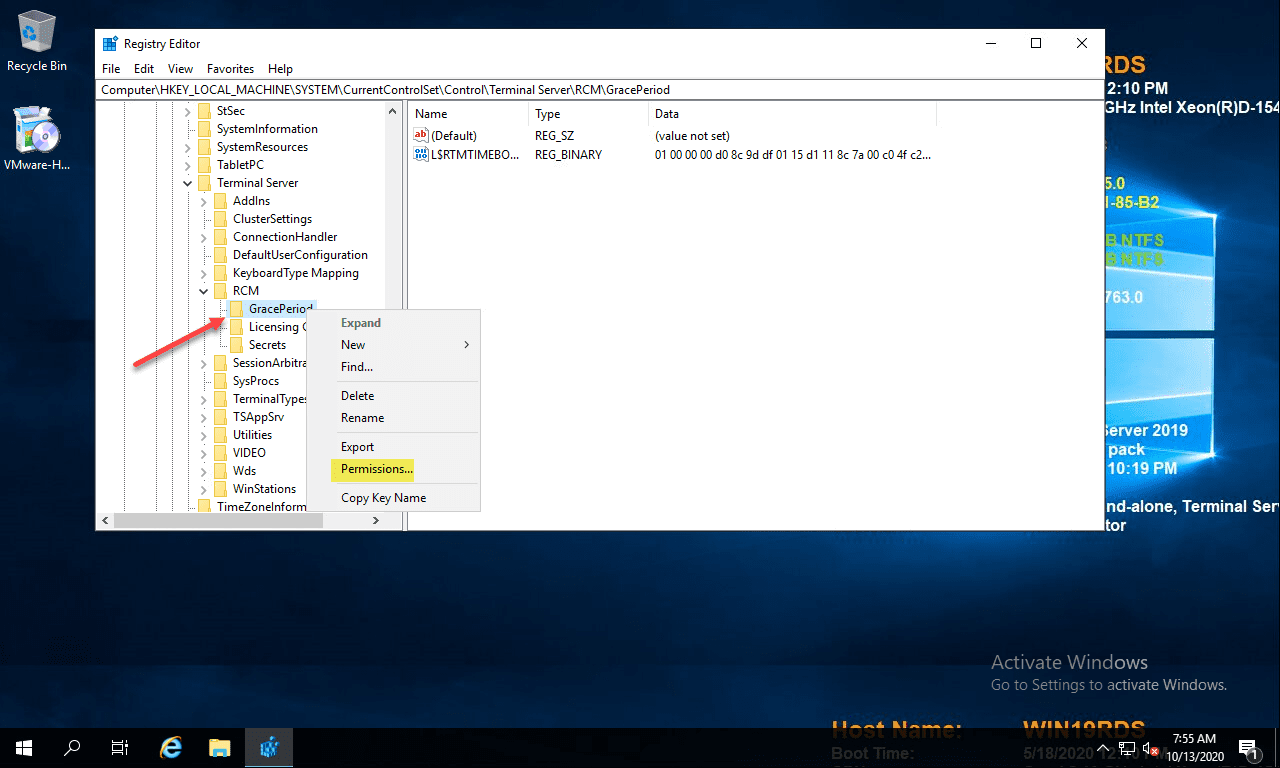
Change Permissions on the RDS GracePeriod key and delete the key
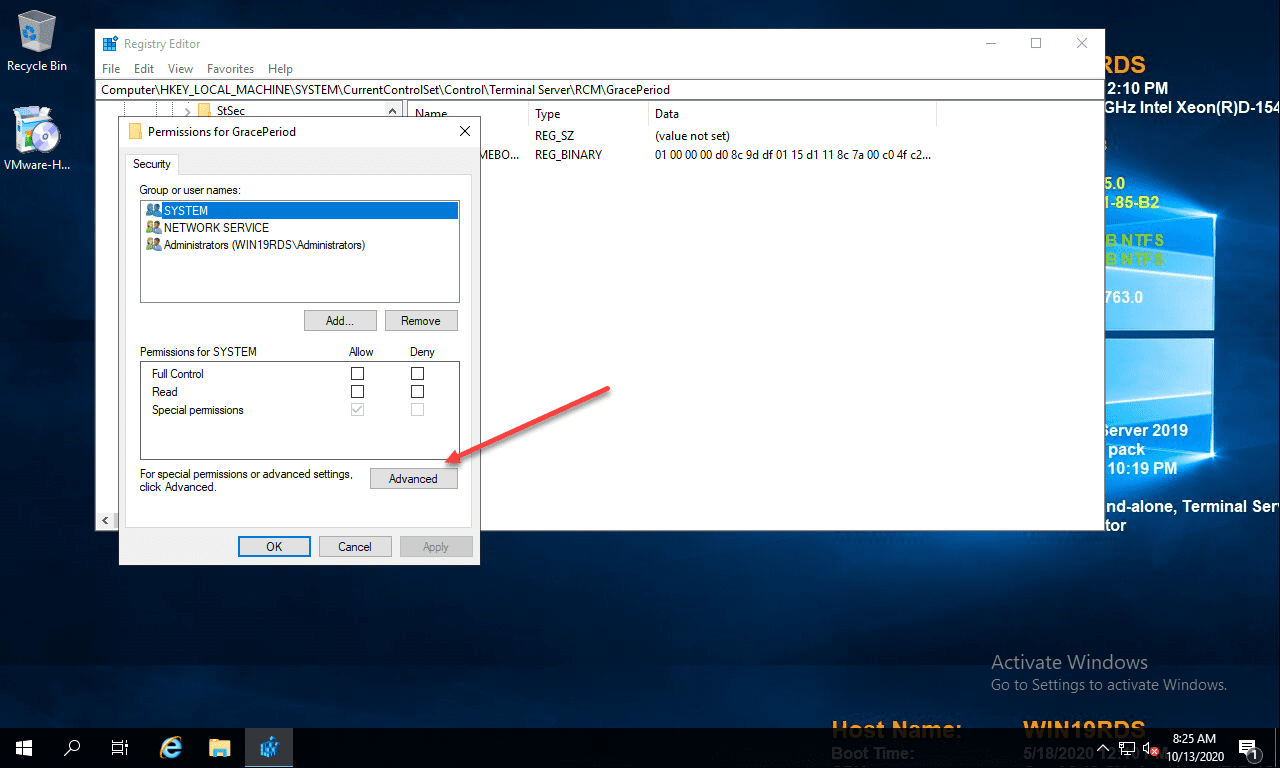
After you have navigated to the key documented above, right-click GracePeriod and select Permissions.
Navigate to the RDS GracePeriod key
For obvious reasons, there are no default permissions on this key for even Administrators. So you have to first take ownership of the key before you can delete the timebomb value. Click the Advanced button on the permissions dialog box.
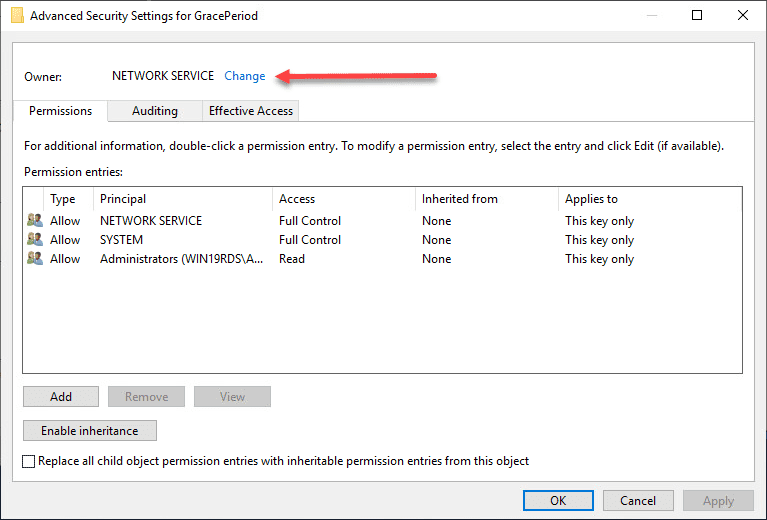
Navigate to the Advanced permissions properties
Click the Change button next to the Owner.
Change the ownership of the registry key
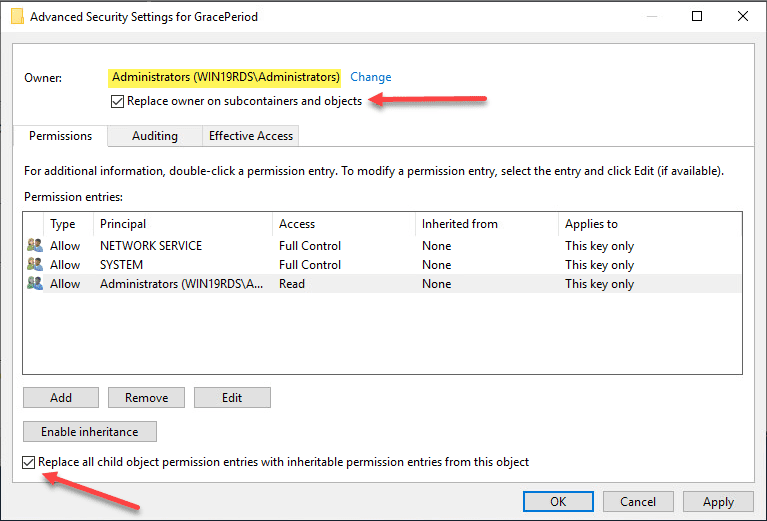
Here I have selected local administrators group as the owner of the
key. However, you will want to choose whichever user/group that you want
to use to delete the registry key. Select the options to replace owners
and replace all child object permissions.
User for ownership selected and set to replace permissions on child objects
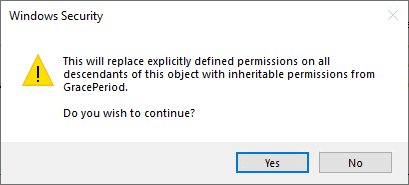
Confirm the replacement of permissions on the registry key.
Confirm replacing permissions
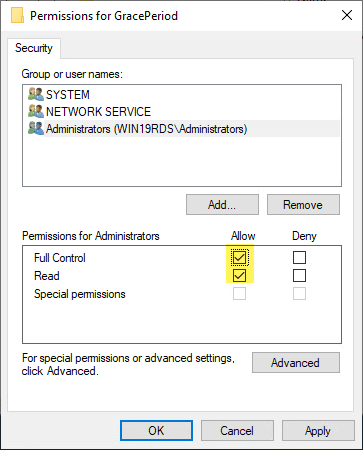
Now that we have changed ownership on the key, we can actually set
permissions without getting permissions errors. Here I am granting
administrators full control on the key.
Change permissions for the user you want to be able to delete the key
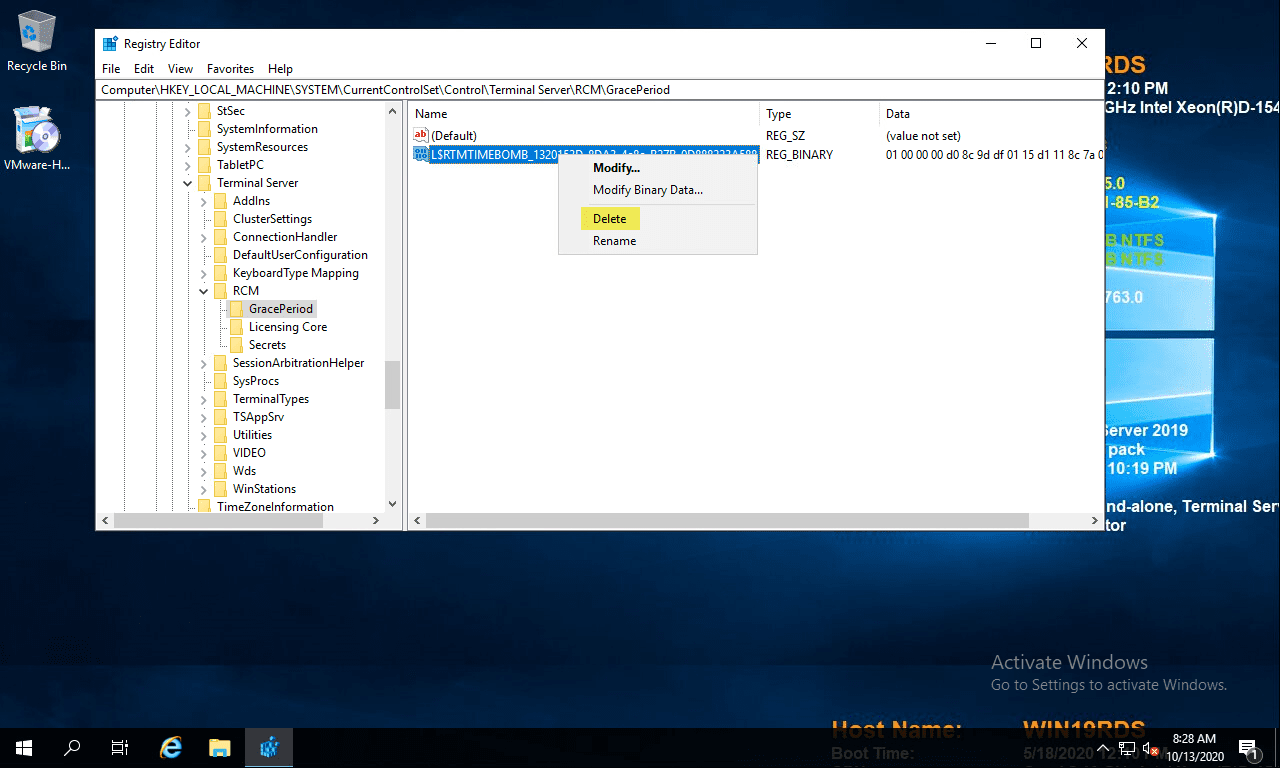
Now, with permissions set, right-click the timebomb value in the GracePeriod key and Delete.
Delete the timebomb key
Confirm the deletion of the registry entry.
Confirm deletion of the timebomb key in the registry
Next, the only thing left to do is reboot your
server. Once the server is rebooted, you can enjoy once again having the
full 120 day grace period for your RDS server in the lab environment.
Сколь просто было поменять Hot keys для переключения языка клавиатуры в Windows 7, столь сложно это сделать сейчас. Видимо, Microsoft таким образом пытается отучить людей от клавиатуры... https://winaero.com/blog/change-hotkeys-switch-keyboard-layout-windows-10/ Recent Windows 10 builds come with a new "Region & Language" page
in the Settings app. It completely replaces the classic "Language"
applet of Control Panel, which is removed starting with Windows 10 Build
17063. The new page allows users to change the display language,
text-to-speech, speech recognition, and handwriting options. Here is how
to change hotkeys to switch keyboard layout in Windows 10 because the
UI for it has changed. If
you upgraded to Windows 10 Build 17074, its new language options can
look strange to you. Unlike previous releases, it does not include the
Language settings UI in the Control Panel. Now you have to use Settings
to configure language settings in Windows 10. By default, Windows 10 comes with two predefined keyboard shortcuts to switch layouts: one of them is the old, familiar Alt + Shift key combination and the other is Win + Space key combination. However, some users also changed the key sequence to Ctrl + Shift or the Grave accent (`), located below Esc. Because of redesigned settings, it may not be so obvious how to change this hotkey. As of this writing, Windows 10 Build 17074
is most recent release of the OS. It doesn't offer any Settings page
which could allow you to change the hotkeys for the input language.
Instead, it offers a link which opens the classic Control Panel applet.
Ironically, this applet is not accessible from the classic Control Panel
any more! The situation should be changed with the final release
version of Windows 10 version 1803. Here are a couple of workarounds we
found that you can use in the mean time to change the hotkeys to switch
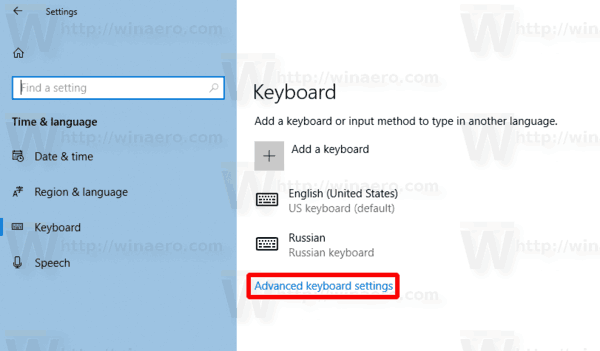
keyboard layout in Windows 10 Builds 17063 and above. To change hotkeys to switch keyboard layout in Windows 10, do the following.
Click on the Advanced keyboard settings link. Update: Starting with build 17083, the Advanced Options link was moved to Devices - Typing. The Keyboard page was eliminated.
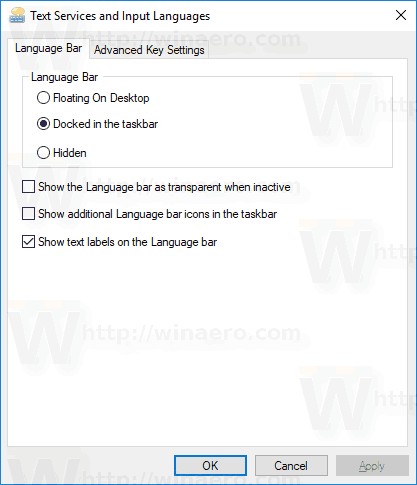
There, click on the link Language bar options.
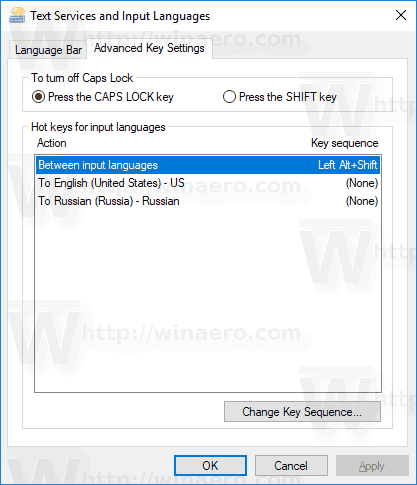
This will open the familiar dialog "Text Services and Input Languages".Tip: This dialog can be opened directly with the following command:Rundll32 Shell32.dll,Control_RunDLL input.dll,,{C07337D3-DB2C-4D0B-9A93-B722A6C106E2}
Switch to the Advanced Key Settings tab.
Select Between input languages in the list.
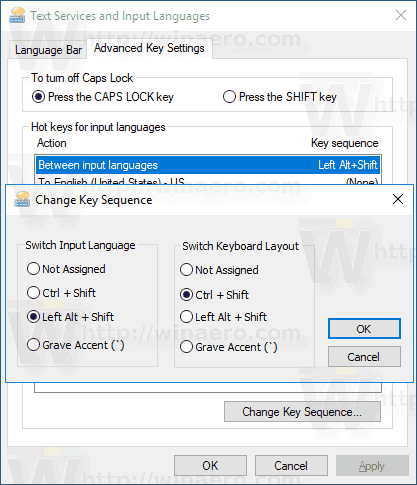
Click on the button Change key sequence, select the new key, and click OK.
You are done. An alternative way you can use is a simple Registry tweak.
On the right, modify or create a new string (REG_SZ) value named Hotkey.
Set it to one of the following values: 1 - Key Sequence enabled; use LEFT ALT+SHIFT to switch between locales. 2 - Key Sequence enabled; use CTRL+SHIFT to switch between locales. 3 - Key Sequences disabled. 4 - The grave accent key (`), located below Esc toggles input locales.
To make the changes done by the Registry tweak take effect, you need to sign out and sign in to your user account.


 Tip: This dialog can be opened directly with the following command: