Сколь просто было поменять Hot keys для переключения языка клавиатуры в Windows 7, столь сложно это сделать сейчас. Видимо, Microsoft таким образом пытается отучить людей от клавиатуры... https://winaero.com/blog/change-hotkeys-switch-keyboard-layout-windows-10/ Recent Windows 10 builds come with a new "Region & Language" page
in the Settings app. It completely replaces the classic "Language"
applet of Control Panel, which is removed starting with Windows 10 Build
17063. The new page allows users to change the display language,
text-to-speech, speech recognition, and handwriting options. Here is how
to change hotkeys to switch keyboard layout in Windows 10 because the
UI for it has changed. If
you upgraded to Windows 10 Build 17074, its new language options can
look strange to you. Unlike previous releases, it does not include the
Language settings UI in the Control Panel. Now you have to use Settings
to configure language settings in Windows 10. By default, Windows 10 comes with two predefined keyboard shortcuts to switch layouts: one of them is the old, familiar Alt + Shift key combination and the other is Win + Space key combination. However, some users also changed the key sequence to Ctrl + Shift or the Grave accent (`), located below Esc. Because of redesigned settings, it may not be so obvious how to change this hotkey. As of this writing, Windows 10 Build 17074
is most recent release of the OS. It doesn't offer any Settings page
which could allow you to change the hotkeys for the input language.
Instead, it offers a link which opens the classic Control Panel applet.
Ironically, this applet is not accessible from the classic Control Panel
any more! The situation should be changed with the final release
version of Windows 10 version 1803. Here are a couple of workarounds we
found that you can use in the mean time to change the hotkeys to switch
keyboard layout in Windows 10 Builds 17063 and above. To change hotkeys to switch keyboard layout in Windows 10, do the following.
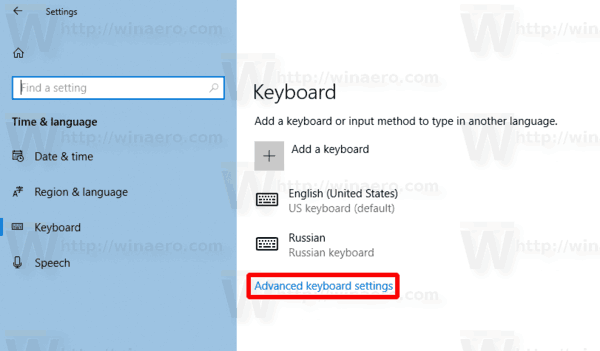
Click on the Advanced keyboard settings link. Update: Starting with build 17083, the Advanced Options link was moved to Devices - Typing. The Keyboard page was eliminated.
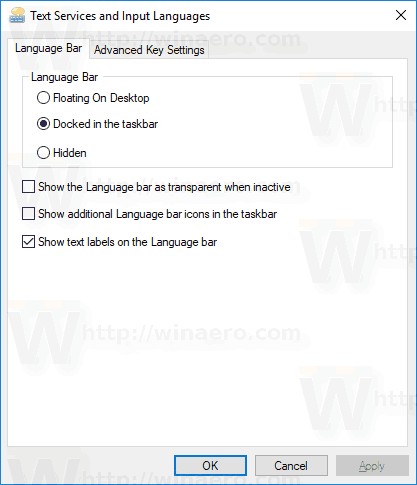
There, click on the link Language bar options.
This will open the familiar dialog "Text Services and Input Languages".Tip: This dialog can be opened directly with the following command:Rundll32 Shell32.dll,Control_RunDLL input.dll,,{C07337D3-DB2C-4D0B-9A93-B722A6C106E2}
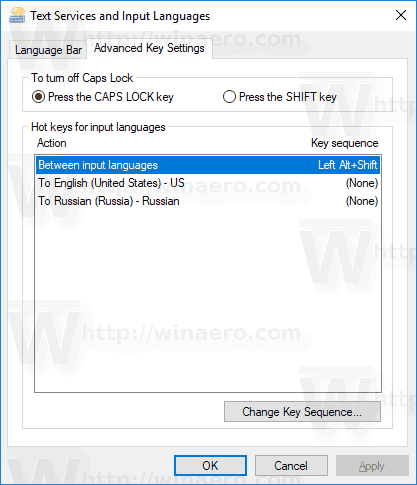
Switch to the Advanced Key Settings tab.
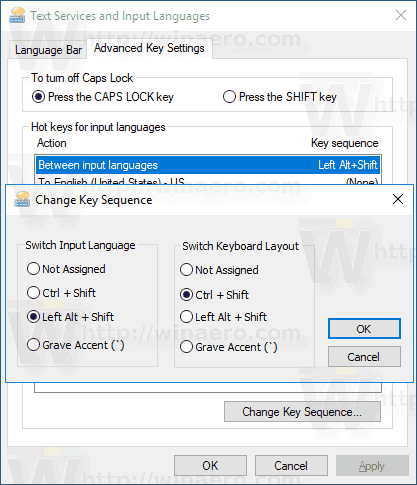
Select Between input languages in the list.
Click on the button Change key sequence, select the new key, and click OK.
You are done. An alternative way you can use is a simple Registry tweak.
On the right, modify or create a new string (REG_SZ) value named Hotkey.
Set it to one of the following values: 1 - Key Sequence enabled; use LEFT ALT+SHIFT to switch between locales. 2 - Key Sequence enabled; use CTRL+SHIFT to switch between locales. 3 - Key Sequences disabled. 4 - The grave accent key (`), located below Esc toggles input locales.
To make the changes done by the Registry tweak take effect, you need to sign out and sign in to your user account.
Привет, админ! После обновления Windows 10 до 1803 (April Update), с моего компьютера не удается подключиться к общим папкам на сетевом NAS хранилище Seagate, также не открывается список шар на компьютере с Windows 7. При попытке открыть любую сетевую папку появляется ошибка:
Сетевая ошибкаWindows не может получить доступ к \\NAS
Проверьте правильность написания данного имени. В противном случае возможно проблема с вашей сетью. Для определения проблем с сетью щёлкните кнопку «Диагностика».
Код ошибки 0x80070035.
Не найден сетевой путь.
При этом на эти же самые папки я могу зайти с телефона или других компьютеров под Windows 10 (еще не обновленных до 1803). Все компьютеры подключены в одну сеть через один коммутатор Ethernet, плюс есть еще Wi-FI точка доступа для подключения в локальную сеть смартфонов/планшетов. Т.е. проблема явно не связана с сетью.
Перепробовал уже много способов, описанных в интернете, ничего не помогает, все также ошибка «0x80070035 Не найден сетевой путь». Могу, конечно, откатить Windows с 1803 к предыдущему билду, но думаю, все равно рано или поздно придется обновляться… Можете что-нибудь посоветовать?
Ответ
Доброго дня! Готового решения вашей проблемы у меня нет. Судя по описанию у вас не доменная сеть, а сеть на базе рабочей группы. Попробую описать, основные шаги, которые нужно проверить для исправления ошибки 0x80070035.
В английской версии Windows 10 эта ошибка выглядит так:
Windows cannot access \\shareError code: 0x80070035.
The network path not found.
В первую очередь нужно понять, связана ли проблема с тем, что в Windows 10 1803 / 1709 по умолчанию отключен небезопасный протокол доступа к сетевым файлам и папкам – SMB v1.0. В том случае, если вы подключаетесь к файловому NAS хранилищу или компьютеру со старой версий ОС (Windows XP / Windows Server 2003), который поддерживает доступ к общим файлам только по протоколу SMBv1, то Windows 10 просто не видит такие сетевые хранилища.
Проверить, включен ли у вас протокол доступа к сетевым ресурсам SMBv1 можно такой командой: Dism /online /Get-Features /format:table | find "SMB1Protocol"
Включить клиент для доступа к сетевым устройствам с поддержкой SMBv1 можно через Панель управления (Программы -> Программы и компоненты -> Включение или отключение компонентов Windows -> Поддержка общего доступа к файлам SMB 1.0 / CIFS -> Клиент SMB 1.0 / CIFS). Можно вызвать окно установки компонентов, выполнив команду optionalfeatures.exe.
Dism /online /Enable-Feature /FeatureName:"SMB1Protocol-Client"
После установки клиента SMBv1 нужно перезагрузить компьютер.
В том случае, если вы используете для доступа к NAS хранилищам или другим компьютерам анонимный доступ, нужно включить политику небезопасные гостевые входы. В Windows 1803/1709 она блокирует доступ анонимным аккаунтоам к сетевым папкам.
В том случае, если ваши компьютеры находятся в рабочей группе, настоятельно советую выполнить рекомендации из статьи Windows 10 перестала видеть сетевое окружение. В частности:
В разделе Network and Sharing Center панели управления на обоих компьютерах проверьте, что в качестве текущего профиля используется частный профиль – Private (Current profile). Убедитесь, что включены следующие опции:
Turn on network discovery (Включить сетевое обнаружение) + Turn on automatic setup of network connected devices (Включить автоматическую настройку на сетевых устройствах);
Turn on file and printer sharing (Включить общий доступ к файлам и принтерам).
В разделе All Networks (Все сети) включите опции:
Turn off password Protect Sharing (Отключить парольную защиту)
Turn on sharing (Включить общий доступ)
На обоих компьютерах сбросьте кэш DNS: ipconfig /flushdns
И перезагрузите оба компьютера.
Что еще стоит проверить.
В свойствах общей папки (как на уровне NTFS разрешений файловой системы, так и на уровне сетевой папке) проверьте, что у группы Everyone есть право на чтение содержимого папки.
Проверьте, открывается ли сетевое хранилище по ip адресу. Для этого в окне проводника наберите \\192.168.1.100 (замените на IP адрес вашего сетевого хранилища).
Проверьте, что на вашем компьютере запущены следующие службы (откройте консоль управления службами services.msc). Попробуйте запустить данные службы и переведите их в режим автоматического запуска с задержкой (Automatic Delayed Start):
Хост поставщика функции обнаружения (Function Discovery Provider Host — fdPHost)
Публикация ресурсов обнаружения функции (Function Discovery Resource Publication — FDResPub)
Служба обнаружения SSDP (SSDP Discovery — SSDPSRV)
Попробуйте временно отключить антивирус или файервол и проверить, сохранилась ли проблема.
Попробуйте переименовать имя компьютера в свойствах системы и после перезагрузки проверить доступ к ресурсам сетевого хранилища.
Попробуйте отключить IPv6 протокол в свойствах вашего сетевого адаптера в панели управления.
Попробуйте выполните сброс сети TCP/IP командами: netsh winsock reset netsh int ip reset
Если проблема возникает только при доступе к сетевому хранилищу NAS (как правило на в качестве платформы используется Linux), можно сохранить пароли для подключения к сетевому хранилищу NAS в менеджере паролей в панели управления (Credential Manager), а в настройках Дополнительных параметров общего доступа включить опцию Использовать учетные записи пользователей и пароли для подключения к другим компьютерам (Use user accounts and passwords to connect to other computers).
Надеюсь, мой ответ будет полезным, и вы восстановите доступ к своим сетевым хранилищам. Dism /online /Enable-Feature /FeatureName:"SMB1Protocol-Client"
После установки клиента SMBv1 нужно перезагрузить компьютер.
В том случае, если вы используете для доступа к NAS хранилищам или другим компьютерам анонимный доступ, нужно включить политику небезопасные гостевые входы. В Windows 1803/1709 она блокирует доступ анонимным аккаунтоам к сетевым папкам.
В том случае, если ваши компьютеры находятся в рабочей группе, настоятельно советую выполнить рекомендации из статьи Windows 10 перестала видеть сетевое окружение. В частности:
В разделе Network and Sharing Center панели управления на обоих компьютерах проверьте, что в качестве текущего профиля используется частный профиль – Private (Current profile). Убедитесь, что включены следующие опции:
Turn on network discovery (Включить сетевое обнаружение) + Turn on automatic setup of network connected devices (Включить автоматическую настройку на сетевых устройствах);
Turn on file and printer sharing (Включить общий доступ к файлам и принтерам).
В разделе All Networks (Все сети) включите опции:
Turn off password Protect Sharing (Отключить парольную защиту)
Turn on sharing (Включить общий доступ)
На обоих компьютерах сбросьте кэш DNS: ipconfig /flushdns
И перезагрузите оба компьютера.
Что еще стоит проверить.
В свойствах общей папки (как на уровне NTFS разрешений файловой системы, так и на уровне сетевой папке) проверьте, что у группы Everyone есть право на чтение содержимого папки.
Проверьте, открывается ли сетевое хранилище по ip адресу. Для этого в окне проводника наберите \\192.168.1.100 (замените на IP адрес вашего сетевого хранилища).
Проверьте, что на вашем компьютере запущены следующие службы (откройте консоль управления службами services.msc). Попробуйте запустить данные службы и переведите их в режим автоматического запуска с задержкой (Automatic Delayed Start):
Хост поставщика функции обнаружения (Function Discovery Provider Host — fdPHost)
Публикация ресурсов обнаружения функции (Function Discovery Resource Publication — FDResPub)
Служба обнаружения SSDP (SSDP Discovery — SSDPSRV)
Попробуйте временно отключить антивирус или файервол и проверить, сохранилась ли проблема.
Попробуйте переименовать имя компьютера в свойствах системы и после перезагрузки проверить доступ к ресурсам сетевого хранилища.
Попробуйте отключить IPv6 протокол в свойствах вашего сетевого адаптера в панели управления.
Попробуйте выполните сброс сети TCP/IP командами: netsh winsock reset netsh int ip reset
Если проблема возникает только при доступе к сетевому хранилищу NAS (как правило на в качестве платформы используется Linux), можно сохранить пароли для подключения к сетевому хранилищу NAS в менеджере паролей в панели управления (Credential Manager), а в настройках Дополнительных параметров общего доступа включить опцию Использовать учетные записи пользователей и пароли для подключения к другим компьютерам (Use user accounts and passwords to connect to other computers).
Надеюсь, мой ответ будет полезным, и вы восстановите доступ к своим сетевым хранилищам.
Microsoft Windows uses a set of Registry keys
known as “shellbags” to maintain the size, view, icon, and position of a
folder when using Explorer. These keys are useful to a forensic
investigator. Shellbags persist information for directories even after
the directory is removed, which means that they can be used to enumerate
past mounted volumes, deleted files, and user actions.
Yuandong Zhu, Pavel Gladyshev, and Joshua James provided a nice overview of the investigative value of shellbags in “Using shellbag information to reconstruct user activities”
[pdf]; however, they do not describe how to programmatically access the
data. Allan S Hay went into greater detail in his December, 2004
document “MiTeC Registry Analyser”
[pdf], although he also leaves out a thorough analysis of the format.
TZWorks provides an effective closed-source shellbag parser sbag,
but does not explain its algorithm. Yogesh Khatri first described the
basic structure of Windows Shell Items in his blog post for 42 LLC
entitled Shell BAG Format Analysis. Joachim Metz went on to described the binary format of the Windows Shell Item structures with great detail in Windows Shell Item format specification
[pdf]. This page documents an approach to parsing shellbags in detail,
as well as introduces an open-source, cross-platform shellbag parser.
Shellbag locations
Shellbags
may be found in a few locations, depending on operating system version
and user profile. On a Windows XP system, shellbags may be found under:
The UsrClass.dat hive file persists the registry key HKEY\_USERS\{USERID}\.
Shellbag Parsing
Let us begin with the Shell\ key. The Shell\ key does not have any values. Under the Shell\ key are two keys: Shell\Bags\ and Shell\BagMRU\.
FOLDERDATA
Each subkey under Shell\Bags\ is named as increasing integers from one, such as Shell\Bags\1\ or Shell\Bags\2\. Let us call these subkeys FOLDERDATA,
since they each represent one item viewed in Explorer, and this is
usually a folder. FOLDERDATA subkeys do not have any values, but often
have subkeys. The most common subkey is Shell\Bags\{Int}\Shell\, but there are a few other possibilities (ComDlg, Desktop,
etc.). The subkeys under a FOLDERDATA describe the settings, position,
and icon when viewing the folder in Explorer. In particular, a Registry
value whose name begins with ItemPos specifies the location of the icons for a given desktop resolution. For example, on my Windows 7 system, the Registry key HKEY\_USERS\{USERID}\Local Settings\Software\Microsoft\Windows\Shell\Bags\6\Shell\{5C4F28B5-F869-4E84-8E60-F11DB97C5CC7} has 12 values that record various configurations. This set includes the value ItemPos1427x820(1) that has type REG_BIN with length 0x120:
0000   00 00 00 00 00 00 00 00 00 00 00 00 00 00 00 00    ................
0010   15 00 00 00 51 00 00 00 14 00 1F 60 40 F0 5F 64    ....Q......`@._d
0020   81 50 1B 10 9F 08 00 AA 00 2F 95 4E 15 00 00 00    .P......./.N....
0030   A0 00 00 00 46 00 3A 00 02 02 00 00 10 3D 0C 8E    ....F.:......=..
0040   20 00 43 79 67 77 69 6E 2E 6C 6E 6B 00 00 2C 00     .Cygwin.lnk..,.
0050   03 00 04 00 EF BE 10 3D 0C 8E 10 3D 0C 8E 14 00    .......=...=....
0060   00 00 43 00 79 00 67 00 77 00 69 00 6E 00 2E 00    ..C.y.g.w.i.n...
0070   6C 00 6E 00 6B 00 00 00 1A 00 15 00 00 00 02 00    l.n.k...........
0080   00 00 5A 00 3A 00 42 06 00 00 10 3D 91 7C 20 00    ..Z.:.B....=.| .
0090   4D 4F 5A 49 4C 4C 7E 31 2E 4C 4E 4B 00 00 3E 00    MOZILL~1.LNK..>.
00A0   03 00 04 00 EF BE 10 3D 91 7C 10 3D 61 85 14 00    .......=.|.=a...
00B0   00 00 4D 00 6F 00 7A 00 69 00 6C 00 6C 00 61 00    ..M.o.z.i.l.l.a.
00C0   20 00 46 00 69 00 72 00 65 00 66 00 6F 00 78 00     .F.i.r.e.f.o.x.
00D0   2E 00 6C 00 6E 00 6B 00 00 00 1C 00 41 01 00 00    ..l.n.k.....A...
00E0   51 00 00 00 30 00 31 00 00 00 00 00 10 3D 2C 81    Q...0.1......=,.
00F0   10 00 4D 49 52 00 1E 00 03 00 04 00 EF BE 10 3D    ..MIR..........=
0100   B0 80 10 3D A7 8C 14 00 00 00 4D 00 49 00 52 00    ...=......M.I.R.
0110   00 00 12 00 41 01 00 00 51 00 00 00 00 00 00 00    ....A...Q.......
With no tools beyond Regedit (or Regview.py), Windows 8.3 filenames (eg. MOZILL\~1.LNK)
and Unicode filenames (eg. Mozilla Firefox.lnk) stand out. Fortunately,
by applying the formats found in Joachim’s paper, more details can be
extracted. Throughout this document, I refer to this Registry value type
as an ITEMPOS value.
ITEMPOS values
The ITEMPOS value’s structure is a list of Windows File Entry Shell Items (SHITEM_FILEENTRY)
terminated by an entry whose size field is zero. The list begins at
offset 0x10. Items are preceeded by 0x8 bytes whose meaning is unknown.
The minimum size of a SHITEM_FILEENTRY structure is 0x15 bytes, so entries whose size field is less than 0x15 should be skipped. The valid SHITEM_FILEENTRY items have the following structure (in pseudo-C / 010 Editor template format):
FILEREFERENCE is a 64bit MFT file reference structure (48 bits file MFT record number, 16 bits MFT sequence number). FILEATTRS
is a 16 bit set of flags that specifies attributes such as if the item
is read-only or a system file. Applying this template to the ITEMPOS
Registry value, we see there are four list items: one invalid entry, and
three SHITEM_FILEENTRY items.
Taking the first valid entry from offset 0x34, let’s parse out
the fields from the binary. The following block visually maps out the
relevant bytes, while the table translates each field into a human
readable value.
00 00 00 00 --> SHITEM_FILEENTRY size
00 00 00 00 --> filesize
00 00 00 00 --> timestamp
00 00 00 00 --> filename
0000 46 00 3A 00 02 02 00 0010 3D 0C 8E 20 00 43 79F.:.....w.=.Ž Cy
0010 67 77 69 6E 2E 6C 6E 6B 00 00 2C 00 03 00 04 00 gwin.lnk..,.....
0020 EF BE 10 3D 0C 8E 10 3D 0C 8E 14 00 00 00 43 00 ï¾.=.Ž.=.Ž....C.
0030 79 00 67 00 77 00 69 00 6E 00 2E 00 6C 00 6E 00y.g.w.i.n...l.n.
0040 6B 00 00 00 1A 00 k.....
Offset
Field
Value
0x00
ITEMPOS size
0x46
0x04
Filesize
0x202
0x08
Modified Date
August 16, 2010 at 17:48:24
0x0E
8.3 Filename
Cygwin.lnk
0x22
Created Date
August 16, 2010 at 17:48:24
0x26
Modified Date
August 16, 2010 at 17:48:24
0x2E
Unicode Filename
Cywgin.lnk
At
this point, it is easy to write parser that explores the FOLDERDATA
keys under the Shell registry key. For each FOLDERDATA, the parser might
enumerate each ITEMPOS value and consider the binary blob. By applying
the binary template above, the tool could identify filenames, MACB
timestamps, and other metadata independent of the filesystem MFT.
Unfortunately, we’re still missing a key piece of information: the full
file path.
BagMRU tree
To recover file paths from Shellbags, we’ll need to consider the Registry keys under BagMRU. The subkeys under Shell\BagMRU form a recursive, tree-like structure that mirrors the file system on disk. Shell\BagMRU
is the root of the tree. Each subkey is a node representing a folder,
and like a folder, may contain children nodes. Yet, unlike (most)
folders, the nodes are named as increasing integers from zero. For
example, the branch Shell\BagMRU\0 might have the children 0, 1, and 2.
All nodes in this tree have a value named MRUListEx, and many have a value named NodeSlot. NodeSlot is what interests us, as it forms the link between the filesystem tree structure and the FOLDERDATA keys. A NodeSlot value has type REG_DWORD and should be interpreted as a pointer to the FOLDERDATA key with the same name. For example, on my workstation, the key Shell\BagMRU\1\1\3\0 has a NodeSlot value of
This means that the FOLDERDATA Shell\Bags\144\ corresponds to a folder with a path of four components. What are they? The components are described by the values at Shell\BagMRU\1, Shell\BagMRU\1\1, Shell\BagMRU\1\1\3, and Shell\BagMRU\1\1\3\0.
SHITEMLIST
In addition to the values MRUListEx and NodeSlot, nodes of the Shell\BagMRU
tree have one value for each subkey. The values have the same name as
the subkey; since the subkeys are named as increasing integers, so are
the values. Each value records metadata about the filesystem path
component associated with the subkey. The values have type REG_BIN, and have an internal binary structure known as an SHITEMLIST. An SHITEMLIST is formed by contiguous items terminated by an empty item. Practically, though, the SHITEMLIST of a BagMRU node will have two entries: a relevant entry, and the empty terminator item. The first word of each SHITEM gives the item’s size.
Joachim’s paper on Window’s shell items is the best resource for understanding the variations among SHITEM entries. From a high level, there are at least ten types of items that range from SHITEM_FILEENTRY and SHITEM_FOLDERENTRY to SHITEM_CONTTROLPANELENTRY.
For each of these types, we can extract at least a path component such
as “My Documents” or “\myserver”. Fortunately, most items have type SHITEM_FOLDERENTRY,
which provides additional metadata including MAC timestamps. A small
number of items do not conform to the known structure, although these do
not usually contain any human readable strings or hints.
Putting it all together
With the SHITEMLIST
structure in hand, we now have enough information to comprehensively
parse Windows shellbags. To do this, first recurse down the Shell\BagMRU
keys while complete directory paths. At each node, record any available
metadata and lookup the associated FOLDERDATA. Recall that the
FOLDERDATA may indicate some of the items contained by the directory, so
record this metadata, too. Finally, format and enjoy!
The following code block lists the algorithm in a Pythonish language for the programmers in the room.
defget_shellbags():shellbags=[]bagmru_key=shell_key.subkey("BagMRU")bags_key=shell_key.subkey("Bags")defshellbag_rec(key,bag_prefix,path_prefix):"""
Function to recursively parse the BagMRU Registry key structure.
Arguments:
`key`: The current 'BagsMRU' key to recurse into.
`bag_prefix`: A string containing the current subkey path of
the relevant 'Bags' key. It will look something like '1\2\3\4'.
`path_prefix` A string containing the current human-readable,
file system path so far constructed.
Returns:
A list of paths to filesystem artifacts
"""# First, consider the current key, and extract shellbag itemsslot=key.value("NodeSlot").value()# Look at ..\Shell, and ..\Desktop, etc.forbaginbags_key.subkey(slot).subkeys():# Only consider ITEMPOS keysforvaluein[valueforvalueinbag.values()if \
"ItemPos"invalue.name()]:# Call our binary processing code to extract itemsnew_items=process_itempos(value)foriteminnew_items:shellbags.append(path_prefix+item.path)# Next, recurse into each subkey of this BagMRU node (1, 2, 3, ...)forvalueinvalueforvalueinkey.values():# Call our binary processing code to extract itemnew_item=process_bag(value)shellbags.append(path_prefix+new_item.path)shellbag_rec(key.subkey(value.name()),bag_prefix+"\" + value.name(), new_item.path ) shellbag_rec("HKEY_USERS\{USERID}\Software\Microsoft\Windows\ShellNoRoam", "", "") return shellbags
Shellbags.py
Using
these concepts, I’ve implemented a cross-platform shellbag parser for
Windows XP and greater in the Python programming language. The code is
freely available here,
so all algorithms and structures are accessible to interested parties.
I’ve licensed the code under the Apache 2.0 license, so please feel
encouraged to take and improve the routines as you feel fit. As a
benchmark, shellbags.py tends to identify at least the items returned by
the sbag utility, and in some cases returns more. Shellbags.py
accepts the path to a raw Registry hive acquired forensically as a
command line argument. To ensure interoperability, output is formatted
according to the Bodyfile specification by default. The following block
lists a demonstration of me running shellbags.py against a Windows XP NTUSER.dat Registry hive.
To improve
readability, I ran the output through the mactime utility to generate a
timeline of activity. The following block lists a portion of this
sample.
For reference, the
following code block lists the command line parameters accepted by
shellbags.py. Now get going and try it out!
usage: shellbags.py [-h][-v][-p] file [file ...]
Parse Shellbag entries from a Windows Registry.
positional arguments:
file Windows Registry hive file(s)
optional arguments:
-h, --help show this help message and exit-v Print debugging information while parsing
-p If debugging messages are enabled, augment the formatting with
ANSI color codes


 Tip: This dialog can be opened directly with the following command: